Imaging a PC is an essential process that allows users to create a copy of their computer’s entire system, including data, software, and settings. This procedure enables users to restore their computer to a previous state quickly, in case of data loss, system failure, or malware attacks.
With the advancement in technology, the need for efficient system backup and recovery has become more crucial than ever. The increasing size of data and higher resolution of files require substantial storage capacity to accommodate backups. Additionally, the wide variety of devices, such as computers, laptops, printers, and scanners, that are connected to the system poses a challenge in terms of capturing and storing their configurations.
When imaging a PC, users must consider various hardware and software components. The computer’s hardware, including the processor, memory, keyboard, mouse, monitor, and interface devices, plays a vital role in the imaging process. Additionally, the operating system and the software applications installed on the PC should be accounted for, as they contribute to the overall system configuration.
To efficiently create an image of the PC, users can use specialized software designed for this purpose. These software applications allow users to select the desired files and directories to include in the backup and specify the backup destination. The imaging process captures a snapshot of the computer’s screen, which can later be restored in case of system failure or data loss.
Contents
- 1 Section 1: Understanding the Importance of System Imaging
- 2 Section 2: Preparing for System Imaging
- 3 Section 3: Step-by-Step Guide for System Imaging
- 4 Section 4: System Recovery from an Image
- 5 FAQ about topic “Imaging a PC: Step-by-Step Guide for Efficient System Backup and Recovery”
- 6 What is the purpose of imaging a PC?
- 7 How often should I create an image of my PC?
- 8 Can I restore my PC to a previous state using the system image?
- 9
- 10 Can I use the system image to transfer my PC’s operating system to a new computer?
Section 1: Understanding the Importance of System Imaging

The importance of system imaging in the context of a laptop or a computer cannot be overstated. System imaging involves creating a complete copy or snapshot of the computer’s operating system, applications, data, and settings. It serves as a backup method to protect against data loss or system failure.
With the ever-increasing reliance on technology, especially in business and personal use, it is essential to have a reliable backup system in place. System imaging allows for quick recovery and restoration of a computer’s data and settings in the event of a hardware failure or other issues.
One of the primary benefits of system imaging is its ability to capture the entire system configuration, including hardware, software, and settings. This includes everything from the operating system and installed applications to user preferences and customizations. This comprehensive backup ensures that all aspects of the system can be restored, saving time and effort in the event of a catastrophic failure.
Furthermore, system imaging provides an extra layer of security for sensitive data. By having a regular backup of the entire system, including files and folders, users can rest assured that their important documents, photos, videos, and other data are safe from accidental deletion, theft, or hardware failure.
Moreover, system imaging simplifies the process of migrating to a new computer or upgrading existing hardware. Instead of manually reinstalling applications, transferring files, and configuring settings, users can simply restore the system image onto the new computer or upgraded hardware. This saves time and minimizes the risk of errors or compatibility issues.
In conclusion, system imaging is an essential tool for efficiently backing up and recovering a laptop or computer’s operating system and data. By creating a comprehensive backup, users can protect against data loss, simplify system migration, and ensure the security of sensitive information. Understanding the importance of system imaging is crucial for any computer user in today’s technology-driven world.
Benefits of System Imaging
System imaging is a process that involves creating a complete backup of a computer’s operating system, applications, and data. This imaging technology offers several benefits that make it a crucial tool for efficient system backup and recovery.
- Easy restoration: With system imaging, you can restore your entire system quickly and easily in case of a hardware failure or software corruption. Instead of reinstalling the operating system and all your applications one by one, you can simply restore the system image, saving time and effort.
- Data protection: System imaging allows you to back up all your data, including documents, photos, and videos, ensuring that no important files are lost in case of a system crash or hard drive failure. You can restore the entire system or select specific files and folders from the image.
- Efficient storage: System imaging technology compresses the entire system into a single image file, which significantly reduces the storage space required. This means that you can store multiple system images on external hard drives or network storage devices without consuming a large amount of storage.
- Hardware independence: System imaging allows you to effortlessly transfer your operating system and applications to a new computer or a different hardware configuration. You can simply restore the system image to the new device, ensuring that all your settings and preferences are preserved.
- Disaster recovery: In the event of a major system failure or a catastrophic event such as a virus attack or natural disaster, system imaging provides a reliable and efficient way to recover your computer. The ability to restore the entire system ensures that you can quickly get back up and running without losing critical data.
Risks of Not Having a System Image
Not having a system image can pose several risks and can potentially lead to significant data loss and system downtime. Here are some risks that you may encounter:
- Data loss: Without a proper system image backup, there is a high risk of losing valuable data stored on your computer. This includes documents, photos, videos, and other important files. A system image serves as a reliable backup that can help you recover your data in case of accidental deletion, hardware failure, or software malfunction.
- System downtime: When your computer experiences a hardware failure or critical software issue, it can result in system downtime. Without a system image, it can take hours or even days to reinstall the operating system, drivers, and software, and restore your data. This downtime can lead to lost productivity, missed deadlines, and frustration.
- Vulnerable to malware: If your computer gets infected with malware or a virus, it can corrupt your files and compromise the security of your system. A system image can act as a restore point, helping you revert your system to a state before the malware infection occurred.
- Hardware failure: Computer hardware components can fail unexpectedly, leading to the loss of data stored on the affected drive or device. A system image stored on an external storage device allows you to quickly recover your system and restore your files onto a new hardware setup, minimizing downtime.
- Software conflicts: Certain software installations or updates can cause conflicts with other programs or the operating system itself. These conflicts can result in system instability, crashes, or errors. With a system image, you can easily roll back your computer to a previous state before the problematic software was installed, saving you the time and effort of troubleshooting the issue.
Common Scenarios Where System Imaging is Crucial
In today’s technology-driven world, computers play a vital role in our daily lives. From personal laptops to business workstations, computers are used extensively for various purposes. However, with the increasing reliance on technology, it is crucial to have a backup plan in case of any unforeseen events or system failures. System imaging is an effective solution that ensures the security and recovery of data in such scenarios.
One common scenario where system imaging is crucial is when a computer’s hardware fails. Whether it’s a faulty hard drive, malfunctioning display screen, or a damaged keyboard, these hardware issues can disrupt our workflow and lead to data loss. By creating a system image, you can restore your computer to its previous state, including the operating system, software, and personal files, thus eliminating the need to reinstall everything from scratch.
Another scenario where system imaging proves to be invaluable is when a computer becomes infected with malware or viruses. These malicious programs can wreak havoc on your PC, causing data corruption, system crashes, and even identity theft. In such cases, having a system image allows you to revert to a clean and secure state, ensuring the safety of your data and protecting your privacy.
Accidental data deletion or file corruption is another common situation where system imaging is crucial. We’ve all experienced the frustration of accidentally deleting an important document or losing valuable data due to a software glitch. With a system image, you can quickly restore the lost files, saving you time and avoiding unnecessary stress.
Lastly, system imaging is particularly important for businesses and organizations. With multiple computers interconnected, the risk of a network failure or catastrophic event is higher. Having system images of each computer allows for quick recovery and minimal downtime, ensuring the continuity of business operations.
In conclusion, system imaging is a crucial technology that provides a reliable backup and recovery solution for computers. Whether it’s hardware failures, malware infections, data loss, or network issues, having a system image can save you time, money, and stress. Invest in a backup solution that includes system imaging to protect your valuable data and ensure the smooth operation of your computer systems.
Section 2: Preparing for System Imaging
Before you begin imaging your PC, it’s important to properly prepare for the process. This section will guide you through the necessary steps to ensure a smooth and efficient system imaging.
1. Back up Your Data: Before you start imaging your PC, it’s crucial to back up all your important data. This includes documents, photos, videos, and any other files you want to preserve. You can use an external hard drive, cloud storage, or a backup software to create a copy of your files.
2. Check Hardware Compatibility: Ensure that your PC’s hardware is compatible with the imaging technology you plan to use. Some imaging software may require specific hardware features or configurations. Check the system requirements of the imaging software and make any necessary upgrades or changes to your PC.
3. Verify Software Compatibility: Ensure that the imaging software you’re planning to use is compatible with your operating system. Check the software’s system requirements and make sure it supports your version of Windows or any other operating system you’re using on your PC.
4. Gather the Necessary Equipment: Make sure you have all the necessary equipment for imaging your PC. This includes a mouse, keyboard, monitor, and any other peripherals you may need. Additionally, ensure that you have a scanner or printer handy for any documents or files you may need to scan or print during the imaging process.
5. Prepare External Storage: Prepare the external storage device where you will save the system image. This could be an external hard drive, USB drive, or network storage device. Ensure that the storage device has enough capacity to store the image and is compatible with the imaging software you plan to use.
6. Set Up a Testing Environment: It’s a good idea to set up a testing environment before performing the system imaging on your main computer. This could be a spare computer or a virtual machine where you can test the imaging process without risking any data on your main PC.
7. Calibrate Your Monitor: To ensure accurate imaging results, calibrate your monitor’s color settings and screen resolution. This will help you achieve optimal imaging quality and consistency across different devices.
8. Install the Imaging Software: Install the imaging software of your choice on your PC. Make sure to follow the installation instructions provided by the software vendor and ensure that the software is properly registered or licensed. Familiarize yourself with the software’s interface and features before proceeding with the system imaging.
9. Update Your System: Before starting the imaging process, ensure that your operating system and all other software are up to date. This will help prevent any compatibility issues and ensure that you have the latest security patches and bug fixes.
By following these steps, you can effectively prepare your PC for the system imaging process. Taking the time to properly prepare will help ensure that the imaging process goes smoothly and that you have a reliable backup of your system.
Creating a Backup Strategy
Backing up your PC or laptop is essential for protecting your important data and ensuring that you can recover your system in case of a hardware failure, software corruption, or other issues. Developing a backup strategy involves considering the various types of data you need to backup, the backup frequency, and the storage medium.
One important consideration is the interface between your PC or laptop and the backup storage. This can include options such as USB, Ethernet, or Wi-Fi, depending on the capabilities of your hardware. Choose a backup storage device that is compatible with your system and provides sufficient storage capacity to accommodate your data needs.
When creating a backup strategy, it’s crucial to identify the specific types of data that you need to backup. This can include files, documents, photos, videos, or other important information. Consider using a scanner or screen capture software to backup physical documents or images.
In addition to backing up your files, it’s also important to consider imaging your entire system. Imaging involves creating a snapshot of your PC or laptop, including the operating system, installed software, and settings. This can be useful for quickly restoring your entire system to a previous state in case of a major issue or system failure.
Consider the backup frequency that best suits your needs and the importance of the data being backed up. For critical data, regular and frequent backups are recommended, while less important files may only need to be backed up periodically. Set up automated backup tasks to ensure regular and consistent backups without manually initiating the process each time.
Lastly, consider storing your backups in multiple locations to ensure redundancy and protection against physical damage or loss. This can include external hard drives, cloud storage services, or network-attached storage devices. Regularly test your backup and recovery processes to verify that your data can be successfully restored in case of need.
Gathering the Necessary Tools and Software
When it comes to imaging a PC and performing efficient system backup and recovery, there are several tools and software that you will need in order to ensure a smooth and successful process.
First and foremost, you will need a computer or laptop that has the necessary hardware and software capabilities to handle the imaging process. This includes a high-resolution monitor, a keyboard and mouse for input, and a printer or scanner for output and data storage.
In addition to the hardware, you will also need the right software. This includes imaging software that is capable of capturing and storing all of the necessary data from your PC. There are many different options available, but it is important to choose one that is compatible with your specific system and offers the features and functionality that you require.
Another important tool to have is a storage device with enough capacity to hold all of your backup data. This could be an external hard drive, a USB flash drive, or even a cloud storage service. It is important to choose a storage solution that is reliable and secure, as your data will be valuable and sensitive.
Furthermore, having a good understanding of PC interface technology, graphics, and other related concepts can also be advantageous when it comes to imaging a PC. This knowledge can help you troubleshoot any issues that may arise and ensure that the process goes smoothly from start to finish.
In conclusion, gathering the necessary tools and software is an essential step in the process of imaging a PC and performing efficient system backup and recovery. By ensuring that you have the right hardware and software, as well as a reliable storage solution, you can ensure a successful and stress-free imaging process.
Checking System Compatibility
Before performing an imaging process or backup, it is crucial to ensure that your computer system is compatible with the software being used. This involves verifying that all the necessary hardware components and peripherals are present and in working condition.
The first thing to check is the operating system of your computer. Make sure that the software you plan to use for imaging or backup is compatible with your current OS version. This will ensure smooth functionality without any compatibility issues.
Next, check the storage capacity of your computer, whether it is a PC or laptop. You should have enough space to store the data and backup files. If necessary, consider upgrading your storage capacity to accommodate the backup process.
Another hardware component to check is the graphics card, especially if you will be using imaging technology that requires high-resolution graphics. Ensure that your computer’s graphics card supports the required resolution for the software.
Along with the graphics card, the display monitor is also important. Ensure that your monitor has the necessary resolution and screen size to support the imaging software. This will ensure that you can view and navigate the software interface effectively.
Furthermore, check the compatibility of other peripherals, such as the mouse and keyboard. Ensure that they are compatible with the imaging software and will work without any issues during the backup process.
If you plan to connect any external devices, such as a printer or scanner, make sure that they are compatible with the imaging software as well. Verify the necessary drivers and software are installed for these devices to function properly during the backup process.
In summary, checking system compatibility before performing system backup or imaging is crucial for a smooth and efficient process. Pay close attention to the operating system, storage capacity, graphics card, monitor resolution, and compatibility of peripherals to ensure a successful backup and recovery operation.
Section 3: Step-by-Step Guide for System Imaging
Imaging a computer system is a crucial process for efficient backup and recovery. By creating an image of your PC, you can easily restore your entire system, including the operating system, applications, and data, in case of any hardware failure, data loss or corruption.
To start the system imaging process, you will need a laptop or PC with a high-resolution screen and a reliable keyboard and mouse for efficient navigation. Make sure your computer has sufficient storage space to accommodate the imaging process, as it requires a large amount of disk space to save the image file.
Before you begin imaging your system, it’s essential to have the necessary imaging software installed on your computer. There are various imaging software available, each with its own interface and features. Choose one that is compatible with your computer’s hardware and operating system.
Once you have the software installed, open it and select the option to create a new image. Choose the destination where you want to save the image file, whether it’s on an external hard drive, network storage, or a separate partition on your computer’s hard drive.
Next, select the drives or partitions you want to include in the image. You can choose to include the entire hard drive or only specific partitions. It’s recommended to include all necessary partitions, including the system and data drives, to ensure a complete backup.
After selecting the drives, configure any additional settings or options provided by the imaging software. This may include compression settings, encryption, or scheduling options for automated backups. Once you have configured the settings, initiate the imaging process.
Depending on the size of your system and the speed of your hardware, the imaging process may take some time to complete. Once it’s finished, you will have a complete image of your computer system, including the operating system, installed applications, and all data. This image can be used to restore your system to its previous state in case of any issues.
It’s important to regularly update your system image to ensure you have the most recent backup of your system. Schedule periodic imaging sessions or manually create new images whenever there are significant changes to your hardware or software configuration.
In conclusion, system imaging is a vital process for efficient backup and recovery. By following this step-by-step guide, you can easily create a complete image of your PC or laptop, ensuring that your data and system are protected from any unforeseen issues or failures.
Creating a System Image
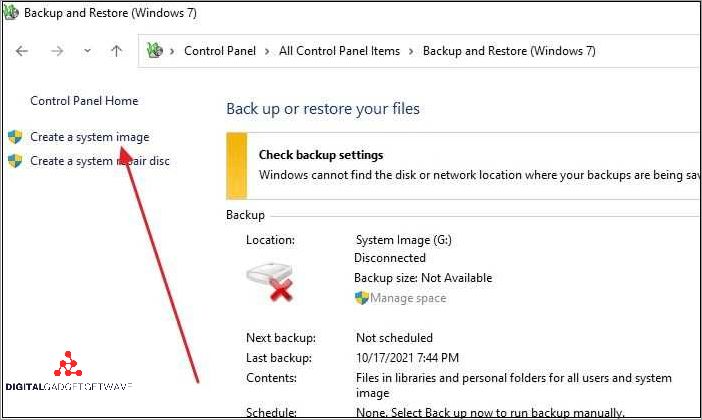
To create a system image of your computer, you will need the right equipment. This includes a printer to start the process, a screen to monitor the progress, and hardware tools to ensure a smooth backup and recovery. The operating system is the core software that manages all the technology and graphics on your computer, so it is important to have a stable and up-to-date system in place.
When creating a system image, you are essentially creating a snapshot of your computer’s data and settings. This includes the interface, storage devices, resolution settings, keyboard shortcuts, and any installed software or scanners. It is a comprehensive backup of your entire system, allowing you to quickly recover in case of data loss or system failure.
Whether you are using a desktop computer or a laptop, the process of creating a system image is relatively straightforward. You can use the built-in backup and recovery tools provided by your operating system, or you can opt for third-party software that offers more advanced features. Whichever method you choose, make sure you have enough storage space to store the image file, whether it is on an external hard drive, network server, or cloud storage.
Creating a system image is an essential step in maintaining the health and stability of your computer. It allows you to easily restore your computer to a previous state in case of hardware failure, software corruption, or accidental data loss. By regularly creating and updating system images, you can ensure that your computer is always ready for any unexpected problems that may arise. Don’t forget to include peripherals such as your keyboard, mouse, and scanner in the backup to ensure a seamless recovery process.
Verifying the System Image
Verifying the system image is an essential step in the imaging process. It ensures that the backup you created is an accurate and complete replica of your PC’s operating system, software, data, and settings. This validation process is crucial for verifying the integrity and reliability of your system image.
There are various technologies and tools available to verify a system image. One common method is to use software specifically designed for this purpose. These programs compare the image file with the original system to check for any discrepancies or errors. They can also perform a thorough scan of the hardware components, such as the graphics card, monitor, keyboard, mouse, scanner, printer, and storage devices, to ensure compatibility and functionality.
During the verification process, it is important to pay attention to details such as screen resolution, graphics settings, and hardware drivers. This ensures that the system image will work seamlessly on the target PC. Additionally, verifying the integrity of the backup helps to identify any potential hardware or data issues that may have occurred during the imaging process.
Once the verification is complete and the system image is confirmed to be accurate and reliable, you can proceed with confidence knowing that you have a valid backup of your PC. This verification step adds an extra layer of assurance that your data and settings can be successfully restored in case of a system failure or data loss.
Storing the System Image
When backing up your computer’s operating system, software, and data, it’s important to have a reliable storage solution for your system image. This image is an exact copy of your computer’s entire hard drive, including the operating system, software applications, files, and settings.
There are several storage options available for storing a system image. One common option is an external hard drive. These drives offer a large amount of storage space and can easily be connected to your computer via USB or another interface. External hard drives are portable and can be easily stored when not in use.
Another option for storing a system image is a network-attached storage (NAS) device. A NAS device is a dedicated file storage system that connects to your computer network. This allows multiple computers to access the system image and other files stored on the NAS device. NAS devices typically offer large storage capacities and can be configured for redundancy, ensuring the safety of your system image.
If you have limited physical space or prefer a more compact solution, you can also store your system image in the cloud. Cloud storage services provide remote storage space accessible over the internet. Popular cloud storage providers include Google Drive, Dropbox, and Microsoft OneDrive. Storing your system image in the cloud ensures that it is protected from physical damage or theft.
Regardless of the storage method you choose, it’s essential to regularly update and test your system image backups. This ensures that you have a recent and accurate copy of your computer’s operating system, software, and data. With a reliable and up-to-date system image, you can quickly restore your computer in the event of a hardware failure, malware infection, or other issues.
Section 4: System Recovery from an Image
System recovery from an image is an important process in ensuring the smooth functioning of a computer. When a computer encounters issues such as crashes, viruses, or data corruption, recovering from a previously created image can help restore the system to a working state.
To begin the system recovery process, users need to have a backup image of their computer’s operating system and data. This image can be created using imaging software that captures a snapshot of the entire system, including the operating system, installed software, user settings, and data files.
Once the backup image is ready, users can proceed to recover their computer by connecting the external storage device containing the image and booting the computer from it. This can be done by accessing the computer’s BIOS or firmware settings and configuring the boot order to prioritize the external storage device.
After booting from the external storage device, users will be presented with an interface that allows them to select the image they want to recover from. They can choose the specific image file and follow the on-screen instructions to initiate the recovery process.
The recovery process involves restoring the backed-up image to the computer’s storage, overwriting any existing system files or configurations. This ensures that the computer will be reverted to the state it was in at the time the image was created, with all the installed software, user settings, and data files intact.
Once the recovery process is complete, users can restart their computer and verify that the system has been successfully restored. They should check that all the hardware components, such as the monitor, keyboard, mouse, printer, and scanner, are working properly, and that the software applications are functioning as expected.
System recovery from an image is an efficient and reliable method for restoring a computer in case of system failures or data corruption. By regularly creating and updating backup images, users can ensure that their systems are protected and can quickly recover from any unforeseen issues that may arise.
Understanding the Recovery Process
The recovery process involves restoring a computer system to a previous state using an imaging software. This software creates a complete backup of the operating system, software applications, and data, allowing users to recover their computer in the event of a system failure or data loss.
When recovering a PC, users interact with a recovery interface displayed on the screen. This interface provides options to select the desired backup image and initiate the recovery process. Users can navigate the interface using a mouse and keyboard, making the recovery process user-friendly and efficient.
The recovery software utilizes graphics technology to display a user-friendly interface with clear instructions and options. This technology ensures that users can easily understand and select the appropriate recovery options, even if they are not familiar with the technical aspects of their computer.
During the recovery process, the software interacts with the hardware components of the computer, such as the monitor, keyboard, and mouse. This interaction allows the software to control the system’s behavior and execute the recovery process effectively.
The recovery process is also dependent on the hardware components of the computer. The software needs to ensure compatibility with different hardware configurations, including the monitor’s resolution, graphics capabilities, and the input/output devices such as printers and scanners. This compatibility ensures a smooth recovery process regardless of the computer’s hardware specifications.
Additionally, the recovery software utilizes storage technology to restore the backup image to the computer’s storage devices. This can include hard drives, solid-state drives, or external storage devices. The software manages the backup and recovery process, ensuring that data is correctly transferred and stored without any loss or corruption.
In conclusion, understanding the recovery process involves recognizing the role of imaging software, the interface displayed on the screen, the graphics technology employed, the interaction with hardware components, and the utilization of storage technology. By comprehending these aspects, users can efficiently recover their system and restore their data in case of any unexpected event.
Restoring the System Image

Restoring the system image is a crucial step in recovering your operating system and all your personal files and data. Whether you’re using a PC, laptop, or any other computer device, the process is straightforward and can be easily done with the help of imaging technology.
To begin the restoration process, you will need to have the system image saved on a storage device, such as an external hard drive or a network location. The system image contains a complete copy of your operating system, software, settings, and personal files.
First, ensure that all hardware devices, such as the keyboard, mouse, scanner, printer, and graphics interface, are properly connected to your computer. This ensures that the system can effectively communicate with the necessary components during the restoration.
Next, boot up your computer and access the recovery interface. This can usually be done by pressing a specific key combination during the startup process, which may vary depending on your computer’s manufacturer. Once in the recovery interface, follow the prompts to restore the system image.
During the restoration process, make sure to carefully select the correct system image file. Depending on the software you’re using, you may be presented with a list of available system images. Choose the one that corresponds to the backup you wish to restore.
After selecting the system image file, confirm your choice and let the restoration process begin. This may take some time, depending on the size of the system image and the speed of your computer’s storage. While the restoration is in progress, it’s important not to interrupt the process.
Once the restoration is complete, your computer will restart, and you should be able to access your operating system and all your personal files and data just as they were at the time of the system image backup. Ensure that everything is functioning properly, including the screen resolution, networking capabilities, and any software or applications you need.
In conclusion, restoring a system image is an essential step in recovering your computer’s operating system and data. By following these steps and using the right imaging software, you can efficiently restore your PC to a previous state without losing any important files or settings.
Testing the Restored System
Once you have successfully restored your system from a backup, it is important to thoroughly test it to ensure that all components and functions are working properly. Testing the restored system will allow you to identify any potential issues and address them before they can cause further problems.
One of the first things to check is the hardware. Test all the components such as the keyboard, mouse, monitor, printer, and scanner for proper functionality. Make sure that they are connected correctly and that they are recognized by the operating system. Check the graphics and display settings, including the resolution and color depth, to ensure that the screen is properly calibrated.
Next, check the software and data on the restored system. Verify that all the necessary software applications are installed and functioning correctly. Test different programs and functionalities to ensure that they are working as expected. Confirm that the data from your backup has been successfully restored and that you can access and open your files without any issues.
Additionally, test the network and internet connectivity on the restored system. Check if you can access websites, send and receive emails, and connect to other devices on your network. Verify that your firewall and antivirus software are properly configured and running to protect your system from threats.
Lastly, test the overall performance and speed of the restored system. Open multiple applications and programs simultaneously to check for any lag or slowdowns. Run benchmark tests to compare the performance of the restored system to its previous state and ensure that there are no performance issues.
By thoroughly testing the restored system, you can ensure that it is fully functional and ready for use. This will give you peace of mind knowing that your backup and recovery process was successful and that your computer is in good working condition.
FAQ about topic “Imaging a PC: Step-by-Step Guide for Efficient System Backup and Recovery”
What is the purpose of imaging a PC?
The purpose of imaging a PC is to create a complete backup of the system, including the operating system, programs, files, and settings. This allows for easy and efficient system recovery in case of hardware failure, system crashes, or other issues. Imaging a PC also enables users to migrate their entire system to a new computer or restore their system to a previous state.
How often should I create an image of my PC?
The frequency of creating a PC image depends on individual needs and usage patterns. It is recommended to create an initial image when the system is set up and stable. After that, it is advisable to create regular images at least once a month or whenever significant changes or updates are made to the system. More frequent images may be necessary for users who frequently install or uninstall programs or make frequent changes to their system settings.
Can I restore my PC to a previous state using the system image?
Yes, the system image allows for easy restoration to a previous state. When restoring the PC using the system image, all the files, programs, and settings from the image will be restored to the exact state they were in at the time the image was created. This can be useful in undoing problematic system updates, resolving software conflicts, or recovering from malware attacks.
Can I use the system image to transfer my PC’s operating system to a new computer?
Yes, the system image can be used to transfer the PC’s operating system to a new computer. This can be done by restoring the system image onto the new computer’s storage device. However, it is important to note that transferring the operating system to a new computer may require additional steps to ensure compatibility with the new hardware, such as installing drivers and adjusting system settings. It is advisable to consult the documentation or support resources of the backup and recovery software being used for specific guidance on transferring the operating system to a new computer.