When it comes to removable storage solutions for your desktop or server, the 5.25 drive bay is an essential component. This tower chassis slot is specifically designed to accommodate a wide range of devices, from optical drives to hard disk enclosures. In this comprehensive guide, we will explore everything you need to know about the 5.25 drive bay, including adapters, screws, cages, and installation tips.
The 5.25 drive bay is a versatile hardware slot that can be found in most desktop computer cases and server racks. It provides an ideal expansion area for mounting various devices, such as CD/DVD drives, Blu-ray players, card readers, or even hot-swappable drive enclosures. The bay itself is a detachable cage that can be easily inserted and secured within the case using screws or other mounting mechanisms.
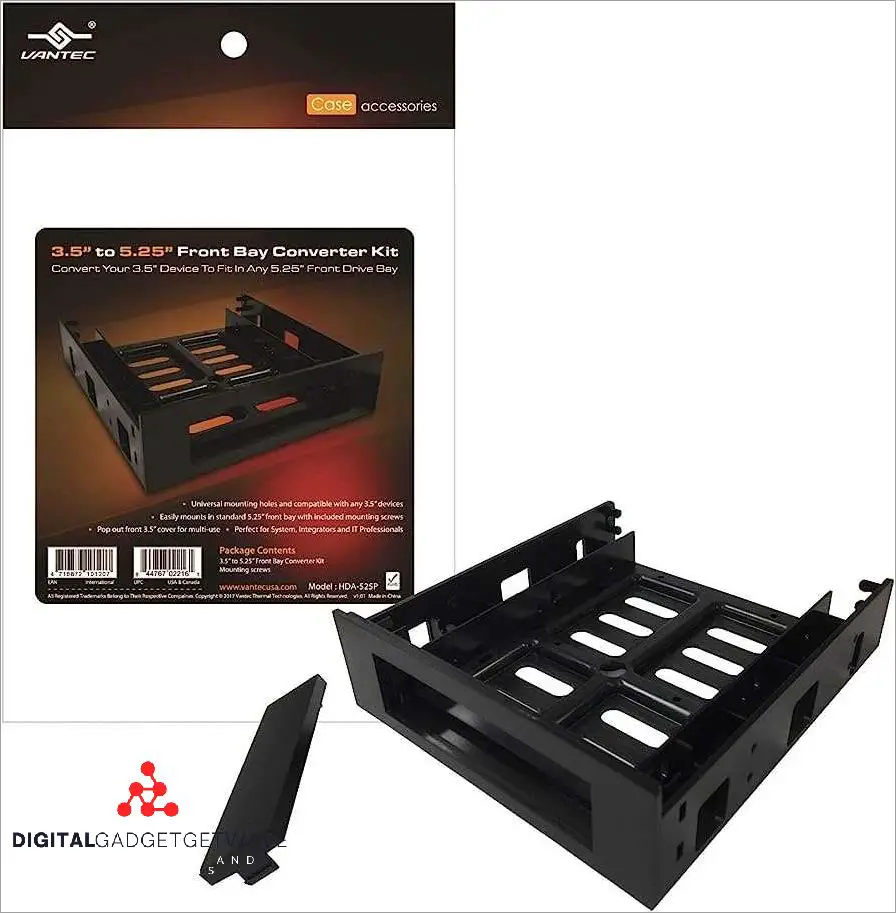
One of the key components of the 5.25 drive bay is the adapter. This device allows you to convert the bay into a different type of slot, such as a 3.5-inch drive bay or a 2.5-inch SSD bay. With the right adapter, you can maximize the storage capabilities of your computer or server, expanding its capacity without sacrificing valuable space.
When it comes to installation, it is important to ensure that the 5.25 drive bay is properly secured within the case or server rack. This involves using screws or other mounting mechanisms to attach the bay to the chassis. Additionally, you may need to use a cage or other hardware to ensure that the drive or device installed in the bay is properly supported and does not move or vibrate during operation.
In conclusion, the 5.25 drive bay is an essential component for any desktop or server system that requires removable storage solutions. Whether you need to install an optical drive, a hard disk enclosure, or any other type of device, the 5.25 drive bay provides a versatile and convenient solution. By understanding the different components and installation techniques, you can maximize the storage capabilities of your computer or server and ensure reliable operation.
Contents
- 1 The Ultimate Guide to 5.25 Drive Bay: Everything You Need to Know
- 2 Benefits and Uses of 5.25 Drive Bay
- 3 Choosing the Right 5.25 Drive Bay
- 4 Installation and Maintenance of 5.25 Drive Bay
- 5 FAQ about topic “The Ultimate Guide to 5.25 Drive Bay: Everything You Need to Know”
- 6 What is a 5.25 drive bay?
- 7 What are the dimensions of a 5.25 drive bay?
- 8 How many 5.25 drive bays are usually available in a computer case?
- 9 What can be installed in a 5.25 drive bay besides optical drives?
- 10 How do I install a device in a 5.25 drive bay?
The Ultimate Guide to 5.25 Drive Bay: Everything You Need to Know

The 5.25 drive bay is a common feature in desktop computer cases and enclosures that provides a versatile and convenient solution for expanding storage and hardware capabilities. It typically consists of a slot in the front of the case where various devices can be installed, such as optical drives, hard drive enclosures, or card readers.
One popular use of the 5.25 drive bay is for mounting storage devices, such as hard drives or solid-state drives, using adapters or mounting cages. These devices can be installed in the bay to provide additional storage capacity or a removable storage solution.
The 5.25 drive bay can also accommodate expansion cards, such as network adapters or audio cards, using compatible brackets or adapters. This allows for easy installation and expansion of hardware capabilities without taking up valuable space inside the computer case.
In addition to desktop computers, the 5.25 drive bay is also commonly found in server rooms or data centers, where it is used for rack-mounted servers. These servers often feature multiple drive bays, allowing for easy installation and removal of storage devices as needed.
Installing devices in the 5.25 drive bay is typically a simple process that involves securing the device in place using screws. The device is then connected to the computer’s hardware using compatible cables. Some cases may also include features such as tool-less installation or hot-swappable bays, making the process even easier.
Overall, the 5.25 drive bay is a versatile and essential component in desktop and server computer cases. It provides a convenient solution for expanding storage and hardware capabilities without taking up valuable space inside the computer chassis. Whether you need additional storage, expansion cards, or removable storage solutions, the 5.25 drive bay has got you covered.
What is a 5.25 Drive Bay?
A 5.25 drive bay refers to a specific type of rack or slot found in computer and server chassis. It is designed to accommodate various types of hardware, most commonly optical drives, such as DVD or Blu-ray drives, as well as other expansion and storage devices.
The term “5.25” is derived from the width of the drive bay, which measures 5.25 inches or 133.35 mm. The height and depth of the bay can vary depending on the specific chassis or enclosure. This size is commonly found in desktop computer towers and server cases, allowing for the installation of multiple drives and other devices.
Typically, a 5.25 drive bay is a removable cage or slot that can hold a drive or other hardware securely in place. It is often made of metal and can be attached to the chassis using screws or other mounting mechanisms. Some chassis may also come with built-in adapters or brackets specifically designed for 5.25 drive bays.
The installation process for a drive or other hardware in a 5.25 drive bay involves attaching it to the bay using screws or other fasteners, and connecting the necessary cables to the motherboard or power supply. This allows the drive to be recognized and accessed by the computer’s operating system.
History of 5.25 Drive Bay
The 5.25 drive bay is a storage expansion feature that has been a staple of desktop computer cases since the early days of personal computing. It was first introduced in the late 1970s as a standard size for floppy disk drives. The bay itself is a rectangular opening in the front of the computer case that is typically located above or below the main power buttons and USB ports.
The drive bay is designed to accommodate various types of hardware, such as optical drives, tape drives, and other removable storage devices. It is typically constructed with a metal cage or enclosure that provides protection for the drive and allows for easy installation and removal. The cage is secured to the case using screws or other mounting hardware.
Over the years, the 5.25 drive bay has undergone several changes and adaptations to keep up with evolving technology. As floppy drives became less common, the bay was repurposed to accommodate CD-ROM drives, DVD drives, and other optical disc drives. With the rise of digital media and the declining popularity of physical media, the drive bay has also been used for additional storage options, such as hard drives and solid-state drives.
The 5.25 drive bay is commonly found in tower-style computer cases, which are often used for gaming or high-performance systems that require additional storage capacity. However, it can also be found in smaller desktop cases and server chassis, providing flexibility for different types of computer hardware configurations.
In recent years, the 5.25 drive bay has become less common as more compact form factors and alternative storage solutions have emerged. However, it remains a useful feature for those who require additional storage or prefer a physical media option. Additionally, adapters and enclosures are available to convert the 5.25 drive bay into a more versatile space, allowing for the installation of other types of hardware, such as fan controllers, card readers, or additional USB ports.
Benefits and Uses of 5.25 Drive Bay
The 5.25 drive bay is an essential component of a computer system that provides numerous benefits and uses. This expansion slot allows for the installation of various hardware devices, making it a versatile and integral part of any desktop or server chassis.
One of the main benefits of the 5.25 drive bay is its ability to support various types of storage devices. Whether it’s a DVD or Blu-ray drive, an external hard drive, or a media card reader, the drive bay provides a convenient and secure mounting solution for these devices. The bay typically features a screw or cage mechanism that allows for easy installation and removal of the hardware.
In addition to storage, the 5.25 drive bay can also be used for other purposes. It can house cooling fans to improve the airflow within the computer case, preventing overheating of critical components. The bay can also accommodate front panel connectors, such as USB ports, audio jacks, or card readers, allowing for easy access to these features.
The 5.25 drive bay is available in different sizes and configurations to fit various computer cases and enclosures. It can be found in both desktop and rack-mountable chassis, making it suitable for different types of setups. The bay can be used to maximize the storage capacity of a tower server or to add additional hardware capabilities to a desktop PC.
With the ability to support a wide range of hardware devices, the 5.25 drive bay is an essential component for expanding the functionality of a computer system. It offers convenience, versatility, and easy installation, making it a valuable asset for any PC enthusiast or server administrator.
Increased Storage Capacity
Upgrading your computer’s storage capacity has never been easier with the use of a 5.25 drive bay adapter. This versatile hardware allows you to add additional drives to your desktop or server tower, giving you more space to store your important files and data.
Installing a 5.25 drive bay adapter is a straightforward process. Simply unscrew the existing drive bay cage in your tower chassis, and then slide in the new adapter. The adapter typically comes with mounting screws that secure it in place, ensuring a sturdy installation.
Once the adapter is securely in place, you can then install your desired drive or drives. Whether you need additional hard drives, solid state drives, or optical drives, the 5.25 drive bay provides the perfect space for expansion. You can even use the bay to add a hot-swappable drive enclosure, allowing for easy removal and replacement of drives without powering down your computer.
The 5.25 drive bay is commonly found in desktop computers and server towers, making it widely compatible with various hardware. Many modern cases come with multiple drive bays, allowing you to add multiple adapters and greatly increase your storage capacity. This is especially useful for those who work with large files or run resource-intensive applications that require ample storage space.
In addition to increasing your storage capacity, the 5.25 drive bay also offers other benefits. It helps with cable management, as you can route all the necessary cables through the bay, keeping them organized and out of the way. The bay also helps with cooling, as its open design allows for better airflow to the drives, preventing overheating and ensuring optimal performance.
In summary, the 5.25 drive bay is an essential hardware component for anyone looking to expand their computer’s storage capacity. With its easy installation process and compatibility with various drive types, it provides a convenient and efficient solution for increasing your available storage space.
Compatibility with Various Devices
5.25-inch drive bays are a common feature in computer cases and are commonly used to house various devices. These bays are designed to accommodate a wide range of devices such as optical disk drives, hard disk drives, card readers, and even additional cooling fans.
One of the most common devices that can be installed in a 5.25-inch drive bay is an optical disk drive. These include CD-ROM drives, DVD-ROM drives, and Blu-ray drives. These drives are commonly used for reading and writing data from optical discs such as CDs, DVDs, and Blu-ray discs.
In addition to optical disk drives, 5.25-inch drive bays can also accommodate hard disk drives. These drives are commonly used for storing large amounts of data and are essential for many computer systems. Installing a hard disk drive in a 5.25-inch drive bay requires the use of a dedicated drive cage or a removable drive bay adapter.
5.25-inch drive bays are also compatible with a variety of other devices, such as card readers. These devices are used to read and write data to various types of memory cards, including SD cards and microSD cards. Installing a card reader in a 5.25-inch drive bay often requires a separate adapter or mounting hardware.
For server or rack-mounted systems, 5.25-inch drive bays can be used to install hot-swappable drive enclosures. These enclosures allow for easy installation and removal of hard drives without the need for powering down the server. They often feature removable drive trays for convenient and secure drive mounting.
In summary, 5.25-inch drive bays are versatile and compatible with a wide range of devices. Whether you need to install an optical disk drive, hard disk drive, card reader, or other device, a 5.25-inch drive bay can provide the necessary space and compatibility for your needs.
Enhancing Performance with 5.25 Drive Bay
The 5.25 drive bay is a versatile piece of hardware that can greatly enhance the performance of your server, desktop, or rack. This slot in your computer’s case is designed to accommodate various storage devices, such as optical drives, hard drives, or solid-state drives.
By providing a convenient and easily accessible location for mounting these drives, the 5.25 drive bay allows for easy installation and quick swapping of storage devices. Additionally, it provides ample space for adding additional drives, expanding your storage capacity and improving overall system performance.
One of the key advantages of using a 5.25 drive bay is its compatibility with a wide range of drive types. With the use of adapters, you can easily install different drive sizes and form factors, including 3.5-inch drives, 2.5-inch drives, or even slim drives. This versatility makes it ideal for both desktop and server environments, allowing you to customize your storage setup to meet your specific needs.
Another benefit of using a 5.25 drive bay is its ability to accommodate not only drives, but also other types of hardware. For example, you can use a 5.25 drive bay to install a fan controller, a media card reader, or a hot-swap bay. This flexibility allows you to optimize your computer’s performance and functionality by utilizing the available expansion slots effectively.
Whether you are building a new computer, upgrading an existing one, or setting up a server or rack system, the 5.25 drive bay offers a reliable and convenient solution for housing your storage devices and other hardware. Its removable and interchangeable nature, along with the use of screws for securing the drives, ensures a secure and stable installation that can withstand the demands of any environment.
Choosing the Right 5.25 Drive Bay
When choosing a 5.25 drive bay for your computer, there are several factors to consider. First, determine what type of hardware you will be using with the drive bay. Some drive bays are specifically designed for optical drives, while others can accommodate a variety of different devices.
The enclosure or cage is another important consideration. Some drive bays come with a built-in enclosure that provides additional protection for your hardware. Others may require a separate enclosure or cage to be purchased. It is important to ensure that the enclosure or cage is compatible with your computer’s chassis or case.
Additionally, consider the number of drive bays you will need. If you require additional storage or expansion capabilities, you may want to choose a drive bay that supports multiple drives. This can be especially useful for servers or desktop computers that require a large amount of storage.
Removable drive bays can also be a convenient option. These allow you to easily swap out drives without having to open up your computer’s case. This is particularly useful if you frequently change the drives in your computer or if you need to use multiple drives for different purposes.
When it comes to installation, consider the mounting options available with the drive bay. Some drive bays require screws for mounting, while others may feature a tool-less installation design. Determine which option is best for your needs and ensure that it is compatible with your computer’s chassis or case.
Overall, choosing the right 5.25 drive bay for your computer involves considering factors such as the type of hardware you will be using, the enclosure or cage, the number of drive bays needed, whether or not removable options are desired, and the installation requirements. By carefully evaluating these factors, you can select the drive bay that best suits your needs.
Understanding Form Factors
The form factor of a drive bay refers to the physical dimensions and layout of the enclosure or chassis that houses the drive. It determines how the drive is installed, mounted, and connected to the computer system.
In desktop computers, the most common form factor for 5.25 drive bays is the standard ATX form factor. This form factor is used in tower cases and allows for easy installation and expansion of drives. The drive bays are usually located at the front of the case, and the drives are mounted in drive cages or brackets that can be easily removed or replaced.
In server or rack-mounted cases, the form factor of the 5.25 drive bays may vary depending on the specific hardware requirements. These cases often have multiple drive bays stacked vertically or horizontally, allowing for high-density storage solutions. The drives are usually mounted in hot-swappable drive trays that can be easily inserted or removed without powering down the server.
The form factor of the drive bay also determines the type and number of connectors available. Common connectors include SATA, IDE, or SCSI, which are used to connect the drive to the computer’s motherboard or storage controller. Additionally, the form factor may include additional features such as ventilation holes, mounting brackets, or screw holes for securing the drive in place.
Understanding the form factor of a 5.25 drive bay is important when choosing the appropriate hardware for your computer or server. It ensures compatibility and ease of installation, as well as the ability to expand your storage capacity when needed.
Considering Connectivity Options
When it comes to connectivity options for a 5.25 drive bay, there are several factors to consider. Depending on your needs and the type of device you want to install, you may need different types of connections and adapters.
If you are using a server or a desktop computer with a storage enclosure, you will most likely require a drive cage. A drive cage is a metal or plastic housing that holds the drives securely in place. It typically has screw holes for easy installation and can be mounted in a 5.25 drive bay. Some drive cages also come with built-in cooling fans to ensure optimal operating temperatures for the drives.
If you need to connect external devices, such as USB hubs or card readers, you can use a front panel or expansion slot adapter. These adapters provide additional ports and allow you to conveniently connect peripherals directly to your computer’s chassis. They can be easily installed in a 5.25 drive bay, providing a neat and organized solution for expanding your connectivity options.
In some cases, you may also require a removable drive enclosure. These enclosures allow you to quickly and easily swap different drives in and out of your computer. They typically come with hot-swap functionality, allowing you to replace drives without shutting down your computer. Removable drive enclosures can be particularly useful for professionals who work with large amounts of data and need to transfer drives between different systems.
For those who need to install multiple drives in a single 5.25 drive bay, there are also multi-bay solutions available. These include drive racks or storage chassis that can accommodate several drives in a compact form factor. They often come with hot-swap functionality, allowing for easy drive installation and removal. Multi-bay solutions are commonly used in server setups or for those who require a large amount of storage in a limited space.
When considering connectivity options for your 5.25 drive bay, it is essential to consider the specific needs of your setup. Whether you require a drive cage, a front panel adapter, a removable drive enclosure, or a multi-bay solution, there are various hardware options available to meet your requirements.
Determining Power Requirements
When it comes to installing drives in your computer, it’s important to consider the power requirements of each drive. The power requirements will vary depending on the type of drive and the specific hardware you are using.
For drives that are designed to fit in a 5.25 drive bay, such as optical drives or certain types of storage enclosures, you will typically need to connect them to your computer’s power supply. This can be done using a power cable that is included with the drive or by using an adapter if the drive uses a different type of power connection.
If you are installing a drive in a tower or rack-mounted server chassis, you may have multiple drive bays available. In this case, it’s important to determine the power requirements for each drive bay and ensure that your power supply has enough connectors to support the installation of all the drives.
When installing drives in a tower or rack-mounted server chassis, it’s also important to consider the cooling requirements of the drives. Drives can generate heat, so proper ventilation and airflow are essential to prevent overheating. Make sure that the drive bays have sufficient space and that there are fans or other cooling mechanisms in place to keep the drives cool.
Additionally, if you are installing multiple drives in a tower or rack-mounted server chassis, you may need to consider using a drive cage or mounting adapter to properly secure the drives in the bay. These accessories can help to ensure that the drives are installed securely and that they are properly aligned with the connectors on the motherboard.
In conclusion, when determining the power requirements for your 5.25 drive bay installation, consider the type of drive you are using, the specific hardware you are using, the cooling requirements, and any necessary accessories, such as drive cages or mounting adapters.
Installation and Maintenance of 5.25 Drive Bay
One of the key components in a computer case, the 5.25 drive bay provides a space for installing various drives and peripherals. To begin the installation process, you should first identify the bay in your computer chassis where you want to install the drive. Most cases have multiple bays, so choose the one that is most convenient for your needs.
Before installing the drive, check if you need any additional hardware or adapters. Some drives may require an expansion adapter or a caddy for proper installation. These can usually be purchased separately and ensure compatibility between the drive and the bay. Additionally, consider if you need any specific tools or screws to secure the drive in place.
Once you have all the necessary components, start by removing the front panel of your computer case. This will give you access to the drive bay. Carefully slide the drive into the bay, ensuring that it aligns with the guide rails or slots provided. In some cases, you may need to remove a drive cage or mounting brackets to accommodate the new drive.
Next, secure the drive in place using the appropriate screws or fasteners. Make sure to tighten them firmly but not excessively, as overtightening can damage the drive or the bay. Once the drive is securely installed, replace the front panel of the case and connect any necessary cables to the drive.
To maintain the 5.25 drive bay and ensure optimal performance, periodically check for any dust or debris that may have accumulated. Use compressed air or a soft brush to gently clean the bay and remove any particles. This will help prevent overheating and prolong the lifespan of your drives.
In summary, the installation and maintenance of a 5.25 drive bay involve identifying the appropriate bay in your computer case, acquiring any necessary hardware or adapters, carefully installing the drive, securing it in place, and regularly cleaning the bay to prevent dust buildup. By following these steps, you can ensure that your drive bay functions properly and provides efficient storage for your computer system.
Step-by-Step Installation Guide
1. Prepare Your Tower or Chassis:
Before beginning the installation process, ensure that your tower or chassis has an available 5.25-inch expansion bay. These bays are typically located on the front panel of the computer case and are used for installing various hardware components.
2. Remove the Bay Cover:
Locate the 5.25-inch bay cover on the front panel of your tower or chassis. You will need to remove this cover in order to install the 5.25-inch drive. Use a screwdriver or other suitable tool to unscrew and remove the cover.
3. Prepare the Drive:
Before inserting the drive into the bay, ensure that it is compatible with your computer system. If necessary, attach any necessary adapters or brackets to the drive to allow for proper mounting. Additionally, check the drive for any removable storage cages or enclosures and remove them as needed.
4. Insert the Drive:
Take the prepared drive and carefully insert it into the 5.25-inch drive bay, aligning the mounting holes on the sides of the drive with the screw holes in the bay. Once aligned, insert screws into the holes to secure the drive in place.
5. Connect the Cables:
Please note that different types of drives may require different types of cable connections. Refer to the manufacturer’s instructions for guidance on how to properly connect the drive to the motherboard or other hardware components.
6. Secure the Drive:
After the cables are connected, double-check that the drive is securely mounted in the drive bay. Ensure that the screws are tightened properly and that the drive does not move or wobble. This will help to prevent any potential damage to the drive during regular use.
7. Replace the Bay Cover:
After confirming that the drive is securely installed, you can replace the 5.25-inch bay cover on the front panel of your tower or chassis. Use the same screws that were removed earlier to reattach the cover.
8. Test the Installation:
Power on your computer and check that the newly installed drive is recognized and functioning properly. Verify that it appears in the device manager or any other relevant software used to manage and monitor hardware components.
9. Complete the Process:
If the drive is recognized and functioning as expected, congratulations! The installation process is complete. You can now use the drive for storing and accessing data, installing software, or any other purposes that you require.
Tips for Proper Maintenance
Proper maintenance of your removable drive bay is essential to keep your hardware functioning optimally. Here are some tips to help you with the maintenance:
- Clean regularly: Dust and debris can accumulate in the drive bay over time, causing it to overheat and potentially damage your drives. Use compressed air or a soft brush to clean the bay regularly and remove any build-up.
- Check for loose screws: As the drive bay is often subjected to vibrations, it’s important to regularly check for loose screws and tighten them if necessary. Loose screws can cause instability and affect the performance of your drives.
- Inspect the drive bay adapter: If you’re using a drive bay adapter to install a different size drive, regularly inspect it for any signs of damage or wear. Replace the adapter if necessary to ensure proper mounting and compatibility.
- Monitor drive temperature: Keep an eye on the temperature of your drives within the drive bay. If they are running too hot, consider adding additional cooling fans or adjusting their placement within the chassis to improve airflow.
- Secure the drive bay: Ensure that the drive bay is securely attached to your desktop, server, or tower case. Loose mounting can cause the bay to move and potentially damage the drives or other hardware components.
- Organize cables: Keep the cables connected to the drive bay neat and organized. Use cable ties or clips to secure them and prevent them from interfering with other components or impeding airflow within the case.
- Regularly update firmware: Check for firmware updates for your drive bay and drives, and apply them as needed. Firmware updates can help improve compatibility, performance, and resolve any known issues.
- Backup your data: To ensure the safety of your data, regularly backup the contents of your drives housed in the drive bay. This will protect your data from loss or corruption in case of drive failure.
By following these tips, you can ensure that your drive bay and its housed drives remain in top condition, providing reliable storage and expansion capabilities for your computer system.
FAQ about topic “The Ultimate Guide to 5.25 Drive Bay: Everything You Need to Know”
What is a 5.25 drive bay?
A 5.25 drive bay is a standard size bay used in computer cases to install optical drives, such as CD/DVD drives, Blu-ray drives, and sometimes even specialized drives like tape drives.
What are the dimensions of a 5.25 drive bay?
A 5.25 drive bay typically measures 5.75 inches in width, 1.625 inches in height, and 7.5 inches in depth. These dimensions are standardized across most computer cases.
How many 5.25 drive bays are usually available in a computer case?
The number of 5.25 drive bays available in a computer case varies from case to case. Some cases may have only one or two 5.25 drive bays, while larger cases can have four, six, or even more. It depends on the specific design and intended use of the case.
What can be installed in a 5.25 drive bay besides optical drives?
In addition to optical drives, there are several other devices that can be installed in a 5.25 drive bay. These include fan controllers, card readers, hot-swap drive bays, additional USB ports, and even small LCD displays for system monitoring.
How do I install a device in a 5.25 drive bay?
Installing a device in a 5.25 drive bay is a relatively simple process. First, remove the front panel of the computer case to access the drive bay. Then, insert the device into the bay and secure it in place using screws or other mounting mechanisms provided. Finally, connect any necessary cables to the device and route them to the appropriate connections on the motherboard or power supply.